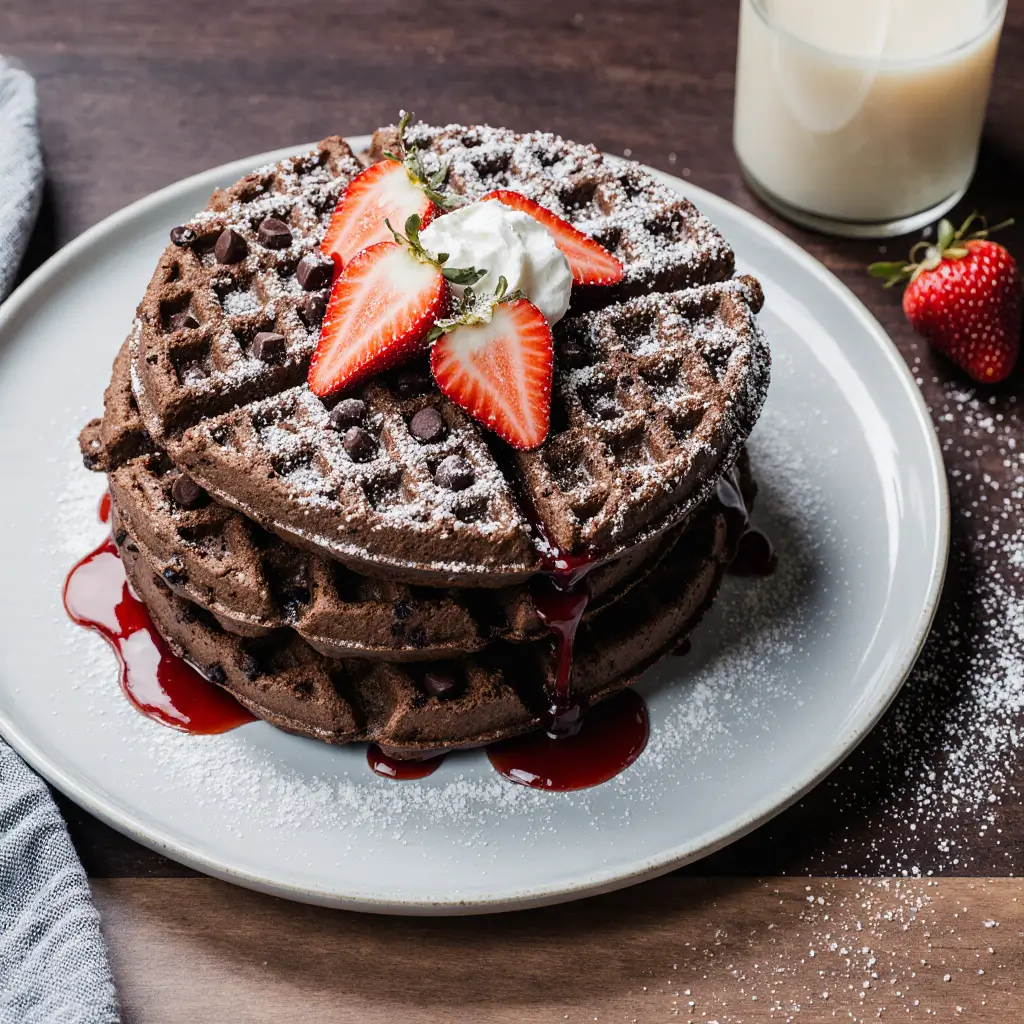
Easy Chocolate Buttermilk Waffles: Irresistible Homemade Treat
Have you ever wondered why your homemade waffles don’t quite hit that perfect balance of fluffiness and rich chocolate flavor? Many waffle enthusiasts find that achieving a tender, moist waffle with just the right hint of chocolate can be tricky. That’s where the magic of buttermilk comes into play. Using buttermilk in your waffle batter isn’t just a fancy touch—it’s the secret ingredient that guarantees an irresistibly tender texture and subtle tang that perfectly complements the chocolate goodness. In this post, you’ll discover how easy chocolate buttermilk waffles can transform your breakfast routine into a decadent homemade treat that’s sure to impress family and friends.
Ingredients List
Creating the ideal chocolate buttermilk waffles starts with quality ingredients. Here’s what you will need:
– 2 cups all-purpose flour (can substitute with whole wheat flour for a nuttier flavor)
– 1/2 cup unsweetened cocoa powder (Dutch processed if available for richer chocolate notes)
– 2 tablespoons granulated sugar (or brown sugar for a deeper caramel hint)
– 1 tablespoon baking powder
– 1/2 teaspoon baking soda
– 1/2 teaspoon salt
– 2 large eggs
– 2 cups buttermilk (can substitute with homemade buttermilk by mixing 2 cups milk with 2 tbsp lemon juice or vinegar, let sit for 5 minutes)
– 1/4 cup melted unsalted butter (coconut oil or vegetable oil as dairy-free options)
– 1 teaspoon pure vanilla extract
– Optional: 1/2 cup chocolate chips for extra bursts of chocolate indulgence
Timing
Perfect waffles are all about timing—both in preparation and cooking. Here’s what to expect:
– Prep time: 10 minutes. Mix and whisk your ingredients while enjoying the aroma of cocoa filling your kitchen.
– Cook time: 15 minutes total (about 3-5 minutes per waffle depending on your waffle iron).
– Total time: Approximately 25 minutes from start to finish—perfect for a leisurely weekend breakfast or brunch where anticipation builds with every bubbling waffle.
Step-by-Step Instructions
Step 1: Mix Dry Ingredients
In a large bowl, whisk together the flour, cocoa powder, sugar, baking powder, baking soda, and salt until well combined. This ensures even distribution of leaveners and cocoa to avoid clumps.
Chef’s tip: Sift the cocoa powder before adding for smoother batter consistency.
Step 2: Combine Wet Ingredients
In a separate bowl, beat the eggs lightly. Add buttermilk, melted butter, and vanilla extract, stirring until well combined. The richness of buttermilk adds moisture and tenderness to your waffles.
Step 3: Incorporate Wet into Dry Mixture
Pour your wet ingredients into the bowl of dry ingredients and gently fold with a spatula. Avoid overmixing—it’s okay if a few lumps remain; this helps keep the waffles fluffy.
Chef’s tip: If you want a more intense chocolate flavor, fold in chocolate chips at this stage.
Step 4: Preheat Your Waffle Iron
Preheat your waffle iron according to manufacturer’s instructions. Once hot, lightly grease it with non-stick spray or brush with a small amount of melted butter.
Step 5: Cook the Waffles
Pour batter onto the preheated iron—about 1/2 cup for standard-sized waffles. Close the lid and cook for about 3-5 minutes or until steaming stops and waffles are crisp on the outside.
Chef’s tip: Avoid opening the waffle iron early to prevent soggy waffles.
Step 6: Serve Warm
Remove waffles carefully and serve immediately, or keep warm in a low oven while you finish cooking the rest.
Nutritional Information
Here’s a general overview of the nutritional content per waffle (based on 6 waffles from this recipe):
– Calories: Approximately 220-250 kcal
– Protein: 6 grams
– Fat: 10 grams (mostly from butter)
– Carbohydrates: 29 grams
– Fiber: 3 grams (from cocoa powder and flour)
– Sugar: 7 grams (varies based on chocolate chips and sugar choice)
– Calcium: Good source thanks to buttermilk
Healthier Alternatives
Looking to give this delectable treat a healthier spin? Consider these ingredient swaps:
– Use whole wheat flour or a blend of oat and almond flour to increase fiber and protein.
– Replace granulated sugar with coconut sugar or maple syrup for a more natural sweetener.
– Swap butter for coconut oil or avocado oil to introduce heart-healthy fats.
– Incorporate unsweetened almond milk-based buttermilk substitute if dairy-free.
– Add chia seeds or ground flaxseed for extra omega-3s and fiber without altering flavor.
Serving Suggestions
Chocolate buttermilk waffles are incredibly versatile—try these ideas to enhance your experience:
– Top with fresh berries and a dollop of Greek yogurt for a tangy twist.
– Drizzle with pure maple syrup or homemade chocolate sauce for extra richness.
– Spread with nut butter (almond, peanut, or cashew) and sprinkle with toasted nuts for added crunch.
– Pair with a side of crispy bacon or sausage for a sweet and savory contrast.
– For seasonal flair, top with pumpkin spice whipped cream in autumn or mint-infused syrup in the spring.
Common Mistakes to Avoid
Even with a simple recipe, small errors can impact the outcome:
– Overmixing the batter: This activates gluten and makes waffles tough instead of tender.
– Not preheating the waffle iron: Leads to uneven cooking and soggy texture.
– Using regular milk instead of buttermilk: You’ll miss out on the tender crumb and subtle tang.
– Adding too much batter: Waffles may overflow and cook unevenly.
– Removing waffles too early: They need to develop a crisp edge, so wait for steam to subside before opening.
Storing Tips
If you have leftovers (though that’s rare!):
– Let waffles cool completely before storing.
– Store in an airtight container or ziplock bag in the refrigerator for up to 2 days.
– For longer storage, freeze waffles separated by parchment paper to prevent sticking, for up to 1 month.
– Reheat in a toaster or oven (350°F for 5-7 minutes) to restore crispness.
Conclusion
Mastering the art of easy chocolate buttermilk waffles means delighting in a rich, tender homemade treat that’s simple yet impressive. With just a few pantry staples and some quick steps, breakfast becomes a decadent event everyone looks forward to. Ready to whip up this crowd-pleaser? Let me know your favorite toppings in the comments or share your photos—happy cooking!
—
FAQs
Q1: Can I make the batter ahead of time?
Absolutely! You can prepare the batter the night before and refrigerate it. Just give it a gentle stir before pouring into the waffle iron. The batter may thicken slightly; add a splash of buttermilk or milk if needed.
Q2: What if I don’t have a waffle iron?
No waffle iron? No problem! You can use the batter to make fluffy chocolate pancakes on a griddle or non-stick pan with similar great flavor.
Q3: How do I make this recipe vegan?
Substitute eggs with flax eggs (1 tbsp ground flaxseed + 3 tbsp water per egg) and use plant-based buttermilk alternatives like almond milk with lemon juice, plus coconut oil instead of butter.
Q4: Why do buttermilk waffles taste better than regular waffles?
Buttermilk reacts with baking soda to produce carbon dioxide bubbles, giving waffles enhanced lift and a tender texture. Its slight acidity also balances the sweetness and richness of chocolate.
Q5: Can I add mix-ins like nuts or fruit?
Definitely! Walnuts, pecans, or diced strawberries fold wonderfully into the batter for extra texture and flavor.
—
For more delicious breakfast ideas, check out our Fluffy Classic Buttermilk Pancakes and Decadent Double Chocolate Muffins. Enhance your morning routine with these tried-and-true favorites!
—
Enjoy your waffle adventure and remember—every bite should be as joyful as the moment you first taste these easy chocolate buttermilk waffles!