Crispy Japanese Katsu Bowls with Easy Homemade Tonkatsu Sauce
Introduction
Have you ever wondered what it takes to create that perfect crispy Japanese katsu bowl right in your own kitchen? Many home cooks assume that achieving restaurant-quality tonkatsu with homemade sauce is a complicated, time-consuming process, but that’s simply not true. With the right recipe and a little know-how, you can enjoy a deliciously crunchy, satisfying katsu bowl topped with rich, flavorful homemade tonkatsu sauce—all ready in about 30 minutes. This recipe not only simplifies the cooking steps but also helps you master the balance of textures and flavors that make this Japanese comfort food a beloved classic.
Ingredients List
To make your crispy katsu bowls with homemade tonkatsu sauce, you’ll need the following ingredients:
For the Katsu:
- 2 boneless pork loin chops (about 1/2 inch thick) or chicken breasts (for chicken katsu)
- Salt and pepper, to taste
- ½ cup all-purpose flour (substitute: gluten-free flour for gluten-free diet)
- 1 large egg, beaten
- 1 cup panko breadcrumbs (Japanese-style breadcrumbs)
- Vegetable oil, for frying (substitution: canola or sunflower oil)
For Homemade Tonkatsu Sauce:
- ¼ cup ketchup
- 2 tbsp Worcestershire sauce (or vegan Worcestershire for a plant-based alternative)
- 1 tbsp soy sauce (low-sodium preferred)
- 1 tbsp mirin (can replace with a splash of honey or sugar syrup)
- 1 tsp Dijon mustard
- 1 tsp rice vinegar
- 1 tsp sugar
For Serving:
- Steamed Japanese short-grain rice or brown rice (for added fiber)
- Shredded green cabbage or steamed vegetables (optional but highly recommended for freshness)
Timing
This recipe fits beautifully into a busy schedule, requiring approximately:
- Prep Time: 10 minutes — Perfect for quickly seasoning and breading the pork or chicken while your kitchen smells inviting.
- Cook Time: 15 minutes — Frying the katsu to a golden crisp and simmering the sauce to perfection.
- Total Time: Approximately 30 minutes, allowing you to have a freshly made, restaurant-inspired meal without the long wait.
Step-by-Step Instructions
Step 1: Prepare the Meat
Gently pound the pork chops or chicken breasts to an even thickness of about ½ inch to ensure uniform cooking. Season both sides generously with salt and pepper.
Chef’s Tip: Use a meat mallet wrapped in plastic wrap to avoid tearing the meat.
Step 2: Set Up the Breading Station
Arrange three shallow dishes: one with flour, one with the beaten egg, and one with panko breadcrumbs. Dredge each piece of meat sequentially in flour, then dip into the egg, and finally coat thoroughly with panko.
Chef’s Tip: Press the panko gently into the meat to create a sturdy crust that stays crispy.
Step 3: Fry the Katsu
Heat about ½ inch of vegetable oil in a large skillet over medium-high heat. Fry each breaded cutlet for 3-4 minutes on each side or until golden brown and cooked through. Transfer to a paper towel-lined plate to drain excess oil.
Chef’s Tip: Keep the oil temperature steady (about 350°F) to avoid greasy or soggy katsu.
Step 4: Make the Tonkatsu Sauce
While frying, whisk together ketchup, Worcestershire sauce, soy sauce, mirin, Dijon mustard, rice vinegar, and sugar in a small bowl. Adjust sweetness or tanginess to your liking.
Chef’s Tip: Let the sauce sit for 10 minutes to allow the flavors to meld.
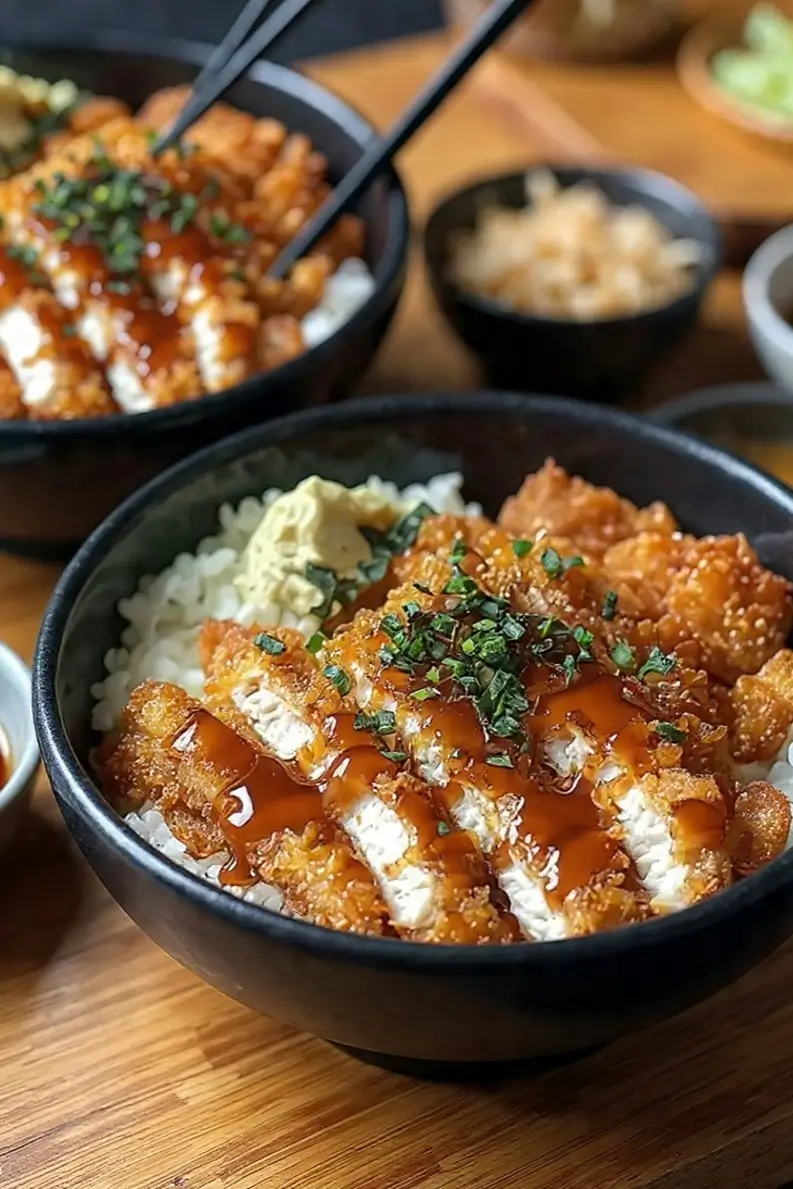
Step 5: Assemble the Katsu Bowl
Spoon steamed rice into bowls, slice katsu into strips, and place it on top. Drizzle generously with homemade tonkatsu sauce and garnish with shredded cabbage or seasonal veggies.
Nutritional Information
Here’s an approximate nutritional breakdown per serving (1 katsu bowl):
- Calories: 550
- Protein: 35g
- Fat: 20g (mostly from frying oil and pork)
- Carbohydrates: 55g
- Fiber: 3g
- Sodium: 700mg (adjustable with low-sodium soy sauce)
This fulfilling dish offers a balanced combination of macronutrients, providing ample protein and energy while keeping carbs moderate.
Healthier Alternatives
For a more health-conscious version without sacrificing flavor:
- Substitute pork with skinless chicken breast or turkey cutlets.
- Use panko made from whole wheat bread for extra fiber.
- Bake or air-fry the katsu instead of deep frying to reduce fat content.
- Swap white rice for quinoa or cauliflower rice to lower carbs.
- Prepare a lighter tonkatsu sauce by using low-sodium or reduced-sugar ingredients.
These swaps maintain the essence of the dish while making it more suitable for various dietary preferences.
Serving Suggestions
Enhance your katsu bowl experience by pairing it with:
- Light miso soup topped with scallions for a comforting side.
- Pickled ginger or daikon radish to add a refreshing zing.
- Japanese pickles (tsukemono) for texture and balance.
- Seasonal steamed vegetables like broccoli or snap peas for added green freshness.
- A sprinkle of toasted sesame seeds or a drizzle of spicy mayo to elevate flavor complexity.
These ideas help you create a well-rounded meal that highlights the dish’s rich and crunchy elements.
Common Mistakes to Avoid
- Skipping the breading sequence: Flour, egg, then panko is essential to build a crispy crust.
- Using cold oil: The oil must be hot enough to sizzle immediately or the katsu will absorb too much oil and become greasy.
- Overcrowding the pan: Fry in batches to keep oil temperature stable and ensure even browning.
- Cutting katsu too early: Let it rest briefly after frying to retain juiciness.
- Rushing on tonkatsu sauce: Mixing the sauce and allowing it to rest enhances flavor depth and richness.
Avoiding these common pitfalls will elevate your homemade katsu bowls to restaurant quality.
Storing Tips
To keep leftovers fresh:
- Store the crispy katsu separately from the rice and sauce in airtight containers in the refrigerator for up to 2 days.
- Reheat the katsu in a toaster oven or air fryer to revive the crispiness, avoiding microwave reheating that makes it soggy.
- Keep the sauce refrigerated in a sealed jar and warm slightly before serving.
- For best taste, assemble the bowl fresh at mealtime.
Proper storage preserves the texture and flavor of your meal, so you enjoy it like it’s freshly made.
Conclusion
Creating a homemade crispy Japanese katsu bowl with flavorful tonkatsu sauce is easier than you might think and rewards you with a satisfying, texturally vibrant meal. Perfectly breaded cutlets paired with a tangy, sweet sauce make this dish a standout in any home cook’s repertoire. Ready to take your taste buds on a Japanese comfort food journey? Try this recipe today and share your delicious results!
Don’t forget to leave a comment with your tips or variations, or sign up for our newsletter to get more authentic Japanese recipes straight to your inbox!
FAQs
1. Can I make this recipe gluten-free?
Yes, substitute regular flour with gluten-free flour and choose gluten-free panko breadcrumbs. Make sure Worcestershire sauce is gluten-free or replace it with tamari.
2. What is the best oil for frying katsu?
Neutral oils with high smoke points such as vegetable, canola, or sunflower oil are ideal for achieving a crispy texture without flavor interference.
3. How do I make the tonkatsu sauce vegan?
Use vegan Worcestershire sauce and replace honey or sugar with maple syrup or agave nectar for sweetness.
4. Can I freeze the cooked katsu?
You can freeze the breaded, uncooked cutlets but it’s best to fry and eat fresh to preserve crispiness. If freezing cooked katsu, reheat in an air fryer to regain texture.
5. What is the difference between katsu and tonkatsu?
Katsu usually refers to breaded and fried cutlets, while tonkatsu specifically means pork cutlets. Chicken or seafood can also be prepared similarly but labeled differently (e.g., chicken katsu).
For more Japanese comfort food inspiration, check out our recipes for Homemade Ramen Broth and Easy Miso Soup. Your kitchen adventure awaits!