Easy Honey Sesame Chicken Recipe for Irresistible Homemade Flavor
Introduction
Have you ever wondered how to recreate that perfectly crispy, sweet, and savory honey sesame chicken right in your own kitchen? Many believe that restaurant-quality dishes require hours of preparation or hard-to-find ingredients, but that’s far from the truth. This easy honey sesame chicken recipe delivers irresistible homemade flavor without the fuss, making it a winner for both weeknight dinners and special occasions. By blending honey and sesame perfectly, this dish balances sweetness and nuttiness in every bite, sure to delight the whole family.
Ingredients List
To make this mouthwatering honey sesame chicken, you’ll need a handful of simple, pantry-friendly ingredients that can easily be swapped based on your preferences or dietary needs:
– Chicken breasts or thighs (2 large, boneless, skinless) – thighs for juicier meat
– Honey (¼ cup) – pure or raw honey works best for natural sweetness
– Soy sauce (¼ cup) – use low sodium for a healthier option, or tamari for gluten-free
– Sesame oil (1 tablespoon) – adds a rich, nutty aroma; substitute with olive oil if unavailable
– Garlic (3 cloves, minced) – fresh for bold flavor, garlic powder can be an alternative
– Cornstarch (2 tablespoons) – to create a crispy coating and thicken sauce; arrowroot powder works well as a gluten-free option
– Water (2 tablespoons) – for sauce dilution
– Rice vinegar (1 tablespoon) – adds acidity and balance; apple cider vinegar as substitute
– Sesame seeds (2 teaspoons) – toasted for garnish and crunch
– Green onions (2, thinly sliced) – for freshness and color
– Salt and pepper (to taste)
– Optional: crushed red pepper flakes for a spicy kick
Timing
– Prep time: 15 minutes – chopping, marinating, and setting up your ingredients
– Cook time: 15–20 minutes – frying the chicken until golden and glazing the sauce
– Total time: Approximately 30–35 minutes
This quick prep and cooking window means you’ll have a steaming plate of honey sesame chicken ready before you know it, with the tantalizing aroma filling your kitchen as the sauce caramelizes.
Step-by-Step Instructions
Step 1: Prepare the Chicken
Pat your chicken dry and cut it into bite-sized pieces, about 1 to 1.5 inches thick. Season lightly with salt and pepper, then toss the chicken in cornstarch until every piece has a thin, even coating. This step is essential for that crispy exterior.
Chef’s tip: If you want extra crunch, try double dredging—dip in water and cornstarch twice.
Step 2: Cook the Chicken
Heat a large skillet over medium-high heat and add a tablespoon of sesame oil. Once hot, add the chicken pieces in a single layer. Avoid overcrowding the pan; cook in batches if needed. Fry for about 4-5 minutes on each side or until golden brown and cooked through. Remove from the pan and set aside.
Helpful alternative: For a lighter version, bake the coated chicken at 425°F (220°C) for 20 minutes, flipping halfway.
Step 3: Make the Honey Sesame Sauce
In the same skillet, reduce heat to medium. Add minced garlic and sauté until fragrant (about 30 seconds). Stir in the soy sauce, honey, water, and rice vinegar. Allow the sauce to simmer for 2-3 minutes until slightly thickened.
Chef’s tip: To thicken the sauce faster and get that perfect glaze, mix a teaspoon of cornstarch with a little cold water and stir it into the sauce.
Step 4: Combine Chicken and Sauce
Return the cooked chicken to the pan, tossing to coat every bite evenly with the luscious honey sesame glaze. Let the chicken cook in the sauce for 1-2 minutes so the flavors meld beautifully.
Step 5: Garnish and Serve
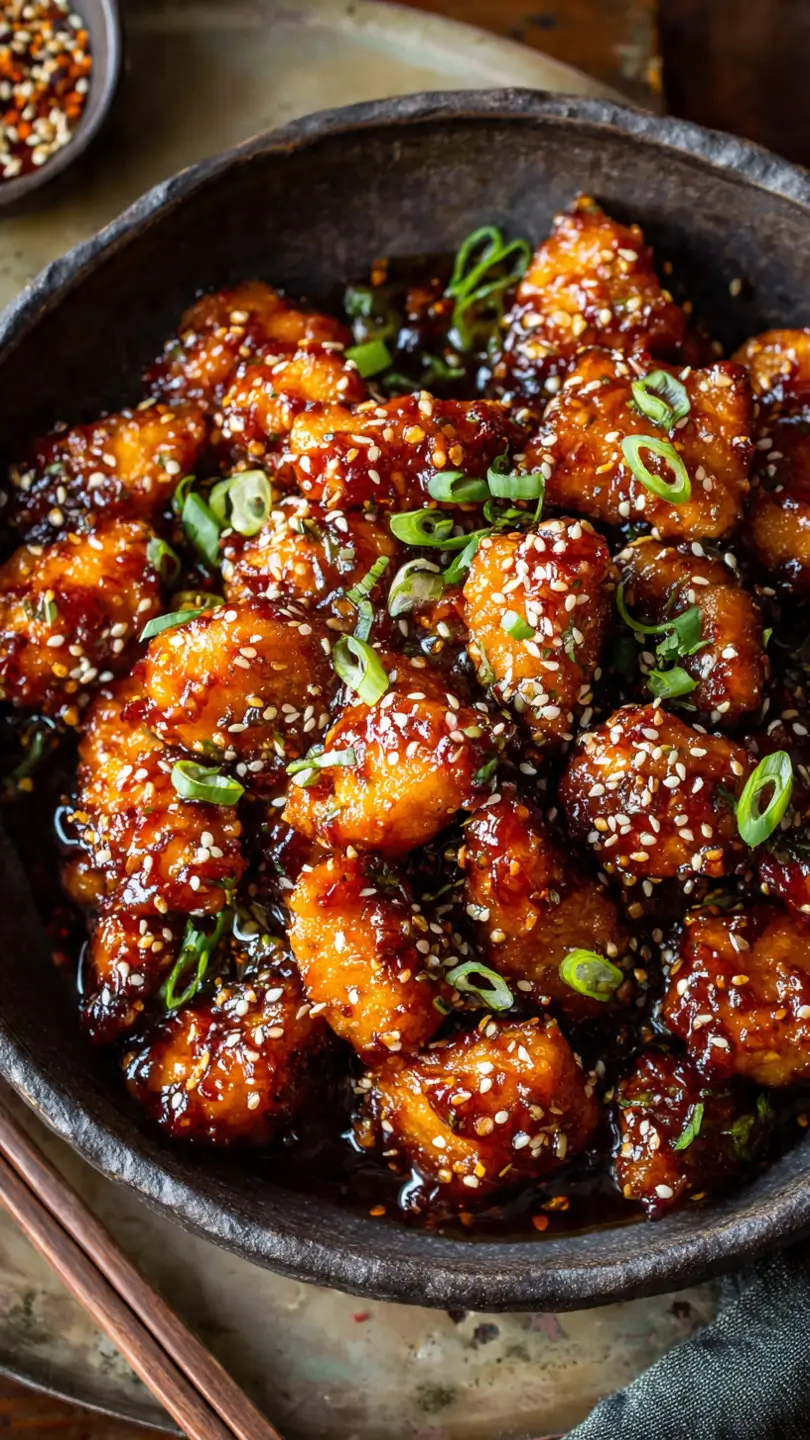
Sprinkle toasted sesame seeds and sliced green onions over the top. Add a pinch of red pepper flakes if you desire a little heat. Serve piping hot over steamed rice or alongside stir-fried vegetables.
Nutritional Information
Here’s a rough breakdown per serving (serves 4):
– Calories: ~350 kcal
– Protein: 30g
– Carbohydrates: 25g (mainly from honey and sauce)
– Fat: 10g (mostly from sesame oil and chicken)
– Fiber: 1g
– Sugar: 18g (from honey)
– Sodium: 700mg (can be reduced by using low-sodium soy sauce)
This balanced profile makes it a great mix of macros, especially for active individuals needing protein and energy.
Healthier Alternatives
If you want to make this recipe a bit lighter or more nutritious, consider these swaps:
– Chicken breast instead of thigh for less fat.
– Substitute honey with pure maple syrup or agave nectar for different flavor profiles.
– Use coconut aminos instead of soy sauce to reduce sodium.
– Replace white rice with cauliflower rice or quinoa for more fiber and nutrients.
– Add steamed or roasted vegetables like broccoli, snap peas, or carrots to boost vitamins and minerals.
Serving Suggestions
This versatile chicken pairs beautifully with:
– Steamed jasmine or basmati rice for a classic combo.
– A side of sticky rice and sautéed bok choy for an Asian-inspired meal.
– Quinoa salad with shredded carrots and edamame for a modern twist.
– Fresh cucumber salad or pickled radishes to cut through the sweetness.
– Garnish with fresh cilantro or lime wedges for added brightness.
Seasonal pairings like roasted Brussels sprouts in winter or grilled asparagus in spring will complement the dish’s flavor and provide variety.
Common Mistakes to Avoid
– Overcrowding the pan: It traps steam, making chicken soggy instead of crispy.
– Skipping the cornstarch coating: Without it, the sauce won’t cling well for that signature glaze.
– Undercooking the sauce: A watery sauce can make the dish feel bland and unappealing.
– Burning the garlic: Garlic cooks quickly; burnt bits turn bitter, so watch closely.
– Using too much soy sauce: Can overpower and make the dish too salty; using low sodium helps balance.
Storing Tips
Allow any leftovers to cool completely before storing in an airtight container. Refrigerate for up to 3 days. To reheat, warm gently in a skillet over low heat, adding a splash of water to loosen the sauce if needed. Avoid the microwave if possible, as it can make the chicken rubbery.
For longer storage, freeze cooked chicken in portion-sized containers for up to 2 months. Thaw overnight in the fridge and reheat as above.
Conclusion
This easy honey sesame chicken recipe is your go-to for a quick and flavorful homemade meal bursting with sweet, savory, and nutty notes. Perfect for busy nights or impressing guests, the simple ingredients and clear steps make it accessible for cooks at any level. Try it today and discover how simple it is to bring restaurant-quality taste to your table!
If you enjoyed this recipe, please leave a comment or review below. Don’t forget to subscribe to our newsletter for more delicious, easy-to-make meals!
FAQs
1. Can I use frozen chicken for this recipe?
Yes! Just thaw it completely before cooking to ensure even cooking and the best texture.
2. Is honey necessary for the sauce?
Honey provides the perfect balance of sweetness and stickiness. However, maple syrup or agave nectar are good alternatives if you’re avoiding honey.
3. Can I make this recipe gluten-free?
Absolutely. Use tamari instead of soy sauce and arrowroot powder in place of cornstarch for thickening.
4. How do I get my chicken extra crispy?
Double coating your chicken and frying in batches helps maintain crispiness. Also, avoid moving the chicken too much while cooking.
5. What sides go best with honey sesame chicken?
Rice is a classic pairing, but try serving with stir-fried greens, roasted vegetables, or a fresh Asian-style slaw for variety.
—
For more flavorful chicken recipes, check out our Garlic Butter Chicken Thighs or Sweet and Spicy Chicken Stir Fry posts. Looking for kitchen essentials? Don’t miss our guide on Must-Have Tools for Easy Weeknight Cooking!