Easy No-Bake Peanut Butter Bars with 5 Irresistible Ingredients
Introduction
Have you ever craved a sweet, satisfying treat but didn’t want to heat up your kitchen or spend hours baking? You’re not alone. Many people assume that delicious dessert bars require complicated recipes and long baking times. But what if you could whip up a crowd-pleasing snack with just a handful of ingredients and zero oven time? That’s exactly what makes easy no-bake peanut butter bars with 5 irresistible ingredients a game-changer for busy food lovers and peanut butter fans alike. These bars are simple, quick, and packed with flavor, perfect for a snack, dessert, or even a quick breakfast boost.
Ingredients List
To make these scrumptious bars, you only need five pantry staples:
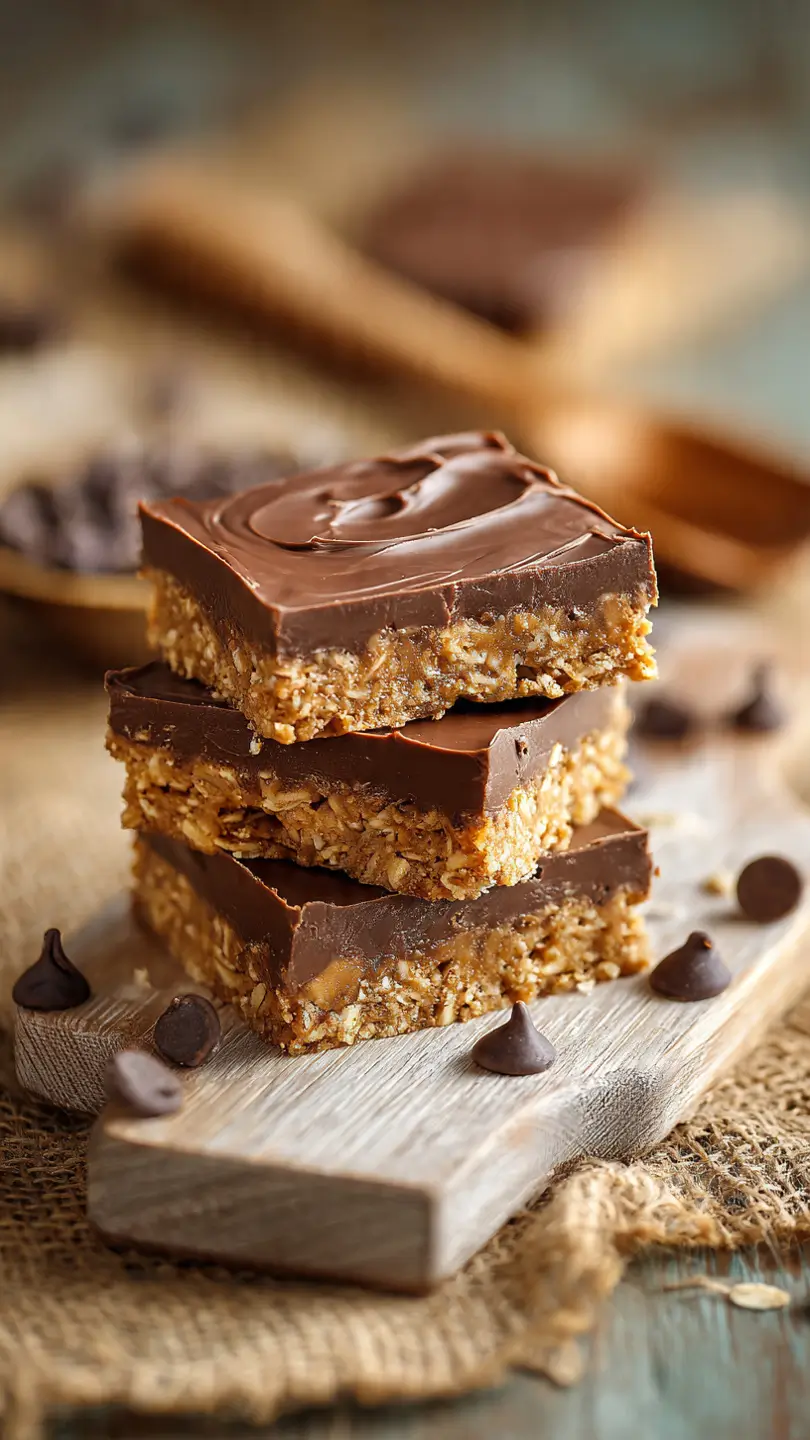
– 1 cup creamy peanut butter (natural or store-bought)
– 1/2 cup honey or maple syrup for a vegan alternative
– 2 cups old-fashioned rolled oats (gluten-free oats work well too)
– 3/4 cup mini chocolate chips (dairy-free or vegan chocolate chips for dietary options)
– 1 teaspoon vanilla extract
Ingredient Substitutions and Alternatives
– Swap peanut butter for almond butter or sunflower seed butter to accommodate nut allergies.
– Use agave syrup or brown rice syrup instead of honey or maple syrup for a lower glycemic index.
– Substitute rolled oats with quinoa flakes for a protein boost.
– Add a pinch of sea salt to enhance the flavors, especially if using unsalted nut butter.
Timing
– Prep time: 10 minutes
– Set time: 1 hour (no baking required!)
– Total time: 1 hour 10 minutes
The prep is fast and hands-on, with a satisfying texture as you mix creamy peanut butter and honey into hearty oats. The bars firm up in the fridge, making this recipe perfect for when you want a quick assembly but crave that indulgent, no-bake treat later.
Step-by-Step Instructions
1. Combine the Wet Ingredients
In a large mixing bowl, stir together the peanut butter, honey (or maple syrup), and vanilla extract until smooth and evenly blended. This mixture creates the rich, creamy base for your bars.
Chef’s tip: Warm the peanut butter slightly in the microwave for 15-20 seconds if it’s too thick to stir easily.
2. Mix in the Oats
Add the rolled oats to the wet mixture and combine thoroughly, ensuring every oat is coated in the peanut butter blend. This helps the bars hold together once set.
3. Fold in Chocolate Chips
Carefully mix in the mini chocolate chips to distribute sweetness and texture evenly throughout the bars. Avoid overmixing to prevent chocolate from melting.
4. Press Into a Pan
Line an 8×8-inch square pan with parchment paper. Press the mixture firmly and evenly into the pan. Use the back of a spoon or your hands (lightly greased) to compact the mixture for the best bar consistency.
5. Chill Until Set
Place the pan in the refrigerator for at least one hour to allow the bars to fully firm up. Once chilled, lift out the parchment paper to remove the whole slab and cut into bars or squares.
Chef’s tip: For easier slicing, warm your knife under hot water and towel dry before cutting.
Nutritional Information
Per serving (1 bar, based on 12 bars total):
– Calories: 180 kcal
– Protein: 5 grams
– Carbohydrates: 22 grams
– Sugars: 12 grams (from natural sweeteners and chocolate chips)
– Fat: 8 grams (mostly healthy fats)
– Fiber: 3 grams
This snack provides a balanced blend of complex carbs, good fats, and protein—ideal for sustained energy or a post-workout nibble.
Healthier Alternatives
If you want to boost the nutritional profile even further:
– Use natural peanut butter with no added sugars or hydrogenated oils.
– Replace mini chocolate chips with cacao nibs for antioxidant-rich crunch.
– Swap honey for pure stevia or monk fruit syrup to reduce sugar content.
– Add a tablespoon of ground flaxseed or chia seeds to increase omega-3s and fiber.
– Use low-sodium nut butters to minimize sodium intake.
Serving Suggestions
These bars are incredibly versatile. Try serving them:
– With a drizzle of melted dark chocolate and a sprinkle of sea salt for an elegant treat.
– Alongside a cup of black coffee or herbal tea for a mid-afternoon pick-me-up.
– Paired with fresh fruit like sliced bananas or strawberries to complement the peanut butter flavor.
– Wrapped individually and packed in lunchboxes or hiking bags for an on-the-go snack.
– Topped with a dollop of Greek yogurt or nut-based yogurt for added creaminess and protein.
Common Mistakes to Avoid
– Using crunchy peanut butter: This can affect the texture and make the bars harder to bind.
– Skipping the chill time: These bars need at least an hour in the fridge to firm up; cutting too early will result in crumbly bars.
– Overmixing the chocolate chips: This causes the chips to melt and compromises the texture.
– Not pressing the mixture firmly enough: Loose packing can cause bars to fall apart when sliced.
– Using quick oats: Rolled oats provide better chewiness and structure. Quick oats can make bars mushy.
Storing Tips
Store your bars in an airtight container in the refrigerator for up to one week. For longer storage, freeze them individually wrapped in parchment paper or plastic wrap. When ready to enjoy, thaw bars at room temperature or in the fridge for 15-30 minutes.
Conclusion
With just five simple ingredients and no oven required, these bars offer a delicious, quick, and nutritious solution for your snack cravings. They’re easy to customize, store well, and satisfy sweet tooths without the fuss. Ready to try your hand at these effortless peanut butter bars? Let us know how they turned out in the comments or share your favorite twist!
Don’t forget to subscribe to our newsletter for more quick recipes and kitchen tips delivered straight to your inbox!
FAQs
Can I make these bars vegan?
Yes! Substitute honey with maple syrup or agave nectar and use vegan chocolate chips to keep the recipe 100% plant-based.
How long do the bars last outside the fridge?
They hold up well for a few hours at room temperature but will soften. Refrigerate for longer shelf life and firmer texture.
Can I add other mix-ins like nuts or dried fruit?
Absolutely! Chopped almonds, walnuts, or dried cranberries make excellent additions without compromising the no-bake simplicity.
What’s the best way to cut these bars neatly?
Use a sharp knife warmed under hot water and wipe dry between cuts for clean slices every time.
Is it necessary to use mini chocolate chips?
Mini chips disperse more evenly and melt less, but regular-sized chips work if you prefer chunkier bites.
—
For more wholesome dessert ideas like these, check out our easy no-bake chocolate energy bites or homemade granola bar recipes. And if you want to master more kitchen basics, explore our guides on pantry staples and essential cooking techniques. Happy snacking!