Irresistible Homemade Banoffee Pie Recipe for Sweet Comfort
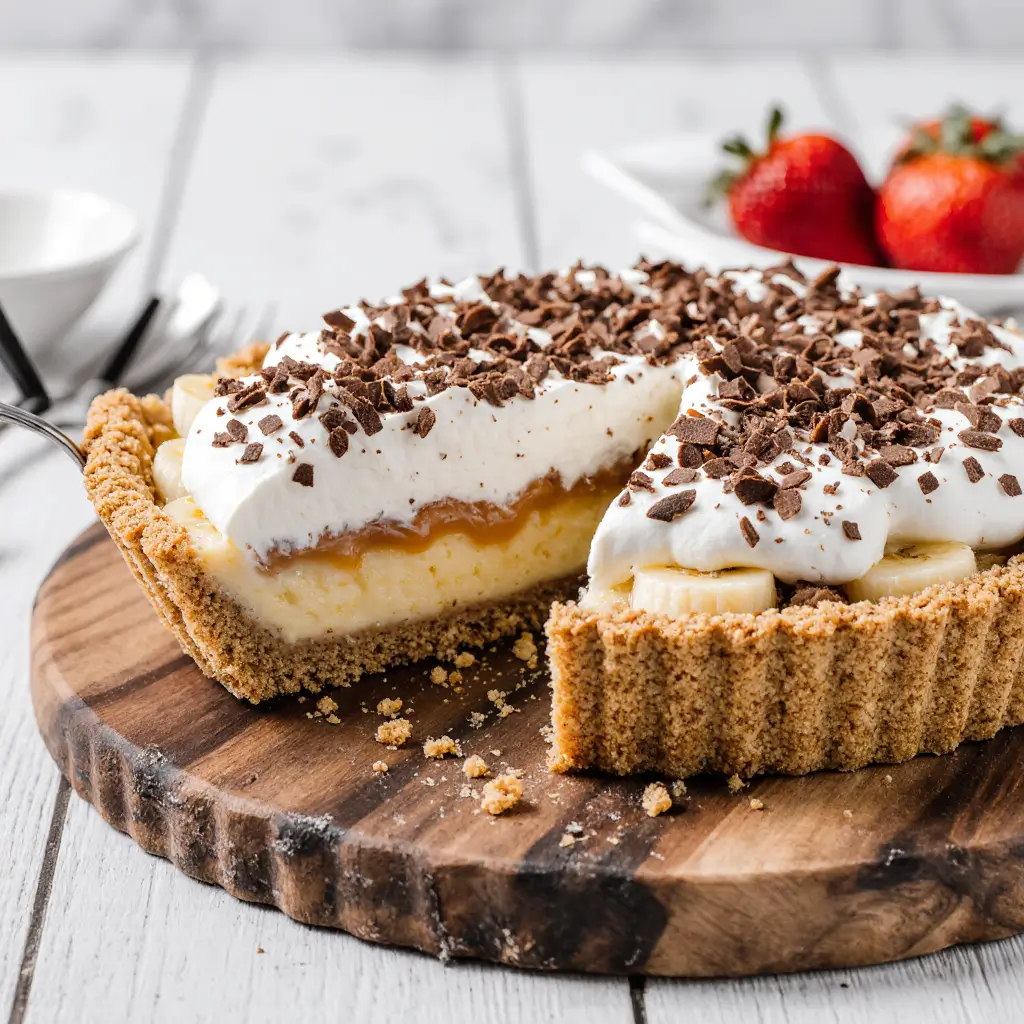
Irresistible Homemade Banoffee Pie Recipe for Sweet Comfort
Have you ever wondered what makes a dessert truly irresistible? Is it the creamy texture, the perfect balance of sweetness, or perhaps the nostalgic comfort it brings? If you’ve been searching for a dessert that captivates all your senses while bringing that warm, cozy feeling, you’re in the right place. This homemade banoffee pie recipe captures just that—a luscious blend of bananas, toffee, and cream that’s simple to make yet impressively delicious. Contrary to popular belief, making this classic treat at home isn’t complicated or time-consuming, and once you master it, you’ll never want to buy it pre-made again.
Ingredients List
To create the perfect banoffee pie, here’s what you’ll need. I’ll also offer some substitutions that cater to different dietary needs or ingredient availability:
– Digestive biscuits or graham crackers (200g) – crushed into fine crumbs. Substitute with gluten-free cookies if you’re gluten-sensitive.
– Unsalted butter (100g), melted – use coconut oil for a dairy-free option.
– Ripe bananas (3 medium) – for the best flavor and sweetness.
– Dulce de leche or ready-made toffee sauce (1 can, about 395g) – homemade caramel can work if you’re up for the extra step.
– Heavy whipping cream (300ml) – use coconut cream for a vegan twist.
– Caster sugar (2 tablespoons) – optional, depending on your sweetness preference.
– Vanilla extract (1 teaspoon) – enhances the vanilla notes in the cream.
– Dark chocolate shavings or cocoa powder (optional) – for garnish.
This combination results in an indulgent yet approachable dessert with rich, smooth layers that blend beautifully.
Timing
– Prep Time: 20 minutes
– Cook Time: 0 minutes (chilling only)
– Chill Time: 2 hours minimum (best if chilled overnight)
The beauty of this pie is that it requires no baking. As you prepare the buttery biscuit base, you’ll hear the satisfying crunch when blending crumbs. The silky caramel layer follows, creating anticipation before the final fluffy cream topping. The chilling time allows the flavors to marry perfectly—a sensory symphony worth waiting for!
Step-by-Step Instructions
Step 1: Prepare the Base
In a bowl, combine crushed digestive biscuits with melted butter until the mixture resembles wet sand. Press this firmly into the base of a 9-inch (23cm) springform or loose-bottomed tin, creating an even layer. Refrigerate for 15 minutes to set the crust.
Chef’s Tip: Use the back of a spoon or a flat-bottomed glass to press down the crumbs evenly for a firm base.
Step 2: Add the Toffee Layer
Open your dulce de leche or toffee sauce and spread it evenly over the chilled base. This sticky, golden layer is the heart of the pie’s sweetness, so don’t skimp.
Chef’s Tip: For a homemade touch, boil a can of sweetened condensed milk for 2-3 hours to create homemade caramel (just be sure to keep the can submerged in water and cool before opening!).
Step 3: Slice and Arrange Bananas
Slice the bananas into rounds about ¼ inch thick. Spread them evenly on top of the toffee layer. Bananas add freshness and a natural fruity sweetness that balances the rich caramel.
Chef’s Tip: Use ripe bananas for maximum flavor but avoid overripe ones to prevent mushiness.
Step 4: Whip the Cream
In a chilled bowl, whip the heavy cream until soft peaks form. Add vanilla extract and sugar while whipping to sweeten and flavor. Spread the whipped cream gently over the banana layer.
Chef’s Tip: Do not over-whip your cream; you want fluffy dollops, not butter.
Step 5: Garnish and Chill
Sprinkle grated dark chocolate or a dusting of cocoa powder on top for that extra touch of elegance and contrast. Cover the pie with plastic wrap and place it in the fridge for at least two hours to allow the layers to set beautifully together.
Nutritional Information
Here is a rough estimation per serving (based on 8 servings):
– Calories: 350
– Protein: 3g
– Fat: 22g (mostly from butter and cream)
– Carbohydrates: 35g
– Sugars: 24g
– Fiber: 2g
Banoffee pie is undoubtedly a treat best enjoyed in moderation, but knowing its make-up helps you balance it within your dietary goals.
Healthier Alternatives
Want to enjoy this dessert with fewer calories or healthier ingredients? Try these swaps:
– Replace digestive biscuits with oat-based or almond flour crust to boost fiber and reduce sugars.
– Use low-fat cream or Greek yogurt whipped with honey instead of heavy cream for fewer calories and more protein.
– Opt for homemade caramel made with coconut sugar or dates blended into a smooth paste for natural sweetness.
– Incorporate unsweetened dark chocolate for antioxidant benefits instead of milk chocolate.
These simple alterations let you indulge mindfully without sacrificing flavor.
Serving Suggestions
Banoffee pie pairs wonderfully with seasonal accompaniments. Serve it with:
– Freshly sliced strawberries or raspberries in summer for bright acidity.
– A drizzle of espresso or coffee syrup to complement the caramel notes.
– A scoop of vanilla bean ice cream for an extra creamy indulgence.
– Mint leaves for a fresh herbal contrast and garnish.
In colder months, a warming cup of spiced chai or hot chocolate alongside makes for cozy dessert moments.
Common Mistakes to Avoid
– Skipping the chill time: The pie needs adequate chilling to set, so don’t rush it or the layers may slide apart.
– Using underripe bananas: This results in a sour taste and an unpleasant texture.
– Overwhipping cream: Leads to butter forming; whip gently and watch closely.
– Not pressing the base firmly enough: A crumbly crust can fall apart when slicing.
– Applying too thick a layer of dulce de leche: Can overpower the banana and cream layers.
Following these tips ensures your pie looks and tastes professional every time.
Storing Tips
Store leftover banoffee pie covered tightly in the refrigerator for up to 3 days. Because bananas tend to brown, slices might darken—adding a squeeze of lemon juice on banana slices before assembly can help slow browning. For longer storage, you can freeze a banoffee pie without the whipped cream for up to a month; add the cream fresh after thawing to maintain texture.
Conclusion
This homemade banoffee pie is your ticket to sweet comfort, combining luscious toffee, fresh bananas, and airy cream in every bite. With simple steps and a few kitchen staples, you can create a dessert that’s as impressive as it is indulgent. Ready to give it a try? Don’t forget to share your experience or ask questions below—you might even inspire someone else’s baking adventure!
FAQs
Q1: Can I make banoffee pie gluten-free?
Absolutely! Swap out the digestive biscuits for gluten-free cookies or crushed nuts to create a gluten-free crust without compromising taste or texture.
Q2: How do I prevent bananas from browning in the pie?
Use ripe but firm bananas, and lightly brush banana slices with lemon juice before layering. Chill the pie immediately after assembling to slow oxidation.
Q3: Is there a vegan version of banoffee pie?
Yes! Use dairy-free biscuits, coconut cream whipped with a touch of maple syrup, and caramel made from coconut milk and sugar as alternatives for a fully vegan banoffee pie.
Q4: Can I prepare this pie in advance?
Certainly! This pie actually benefits from resting in the fridge overnight, which helps the flavors meld and the texture improve.
—
For more delicious dessert inspirations, check out our Classic Chocolate Mousse Recipe or No-Bake Cheesecake Guide. Also, explore our Ultimate Guide to Baking with Bananas to master all things banana in your kitchen. Happy baking!