Delicious Mini Christmas Cheesecake Cups for Easy Serving
Introduction
Have you ever wondered how to create a festive dessert that’s both charming and easy to serve at your holiday gatherings? Many people believe that cheesecakes are complicated, heavy, and difficult to portion, especially during the busy Christmas season. Yet, with this delightful mini Christmas cheesecake cups recipe, you can enjoy all the creamy richness of a traditional cheesecake without the fuss. These mini cheesecakes are perfect for effortless serving, making your festive celebrations both elegant and stress-free.
In this post, we’ll guide you through every step to make delicious mini Christmas cheesecake cups, ensuring your holiday treats impress family and friends. Let’s unwrap the secret to navigating the holiday dessert scene with ease and style!
Ingredients List
Crafting these mini cheesecake cups requires simple pantry staples and festive touches. Here’s exactly what you’ll need:
– 8 oz (225g) cream cheese, softened – For a lighter version, try low-fat cream cheese or Greek yogurt.
– 1/3 cup granulated sugar – Substitute with coconut sugar or honey for natural sweetness.
– 1 large egg
– 1 tsp vanilla extract
– 1/2 cup sour cream – Alternatively, use plain Greek yogurt for a tangier taste and added protein.
– Mini graham cracker crumbs, about 1 cup – Use crushed digestive biscuits for a similar texture.
– 2 tbsp melted butter
– Fresh cranberries or pomegranate seeds – Perfect for a holiday flair.
– Optional: red and green sprinkles or edible glitter for decoration.
Feel free to customize with festive spices like cinnamon or nutmeg for that extra Christmas magic!
Timing
Timing your dessert preparation efficiently will keep your holiday prep stress-free and enjoyable.
– Prep Time: 15 minutes – Enough time to gather ingredients and prepare your baking tins.
– Cook Time: 18-20 minutes – Watch for that perfect set but still creamy texture.
– Cooling Time: 1-2 hours (including chilling in the fridge) – This is when the magic happens, and your cheesecake sets beautifully.
In total, expect around 2 hours from start to finish, including chilling. The best part? Most of the time is hands-off, letting you focus on other holiday activities or decorations!
Step-by-Step Instructions
Step 1: Prepare the Base
Combine the graham cracker crumbs and melted butter in a bowl until the mixture resembles wet sand. Spoon about a tablespoon of this into each mini cupcake liner or silicone mold, pressing down firmly to create an even crust layer. Chef’s tip: Use the bottom of a small glass or your fingers to get a compact base – this prevents crumbling when serving.
Step 2: Mix the Cheesecake Filling
In a large bowl, beat the softened cream cheese with sugar until smooth and creamy. Add the egg and vanilla extract, mixing well to combine. Fold in the sour cream gently until the texture is luscious and silky.
Step 3: Fill the Cups
Spoon the cheesecake mixture evenly over the prepared crusts, filling each about ¾ full. Avoid overfilling to prevent cracking during baking.
Step 4: Bake to Perfection
Preheat your oven to 325°F (160°C). Bake the mini cheesecakes for approximately 18-20 minutes until the edges set but the center still jiggles slightly. This ensures a creamy texture rather than a dense finish.
Step 5: Chill and Decorate
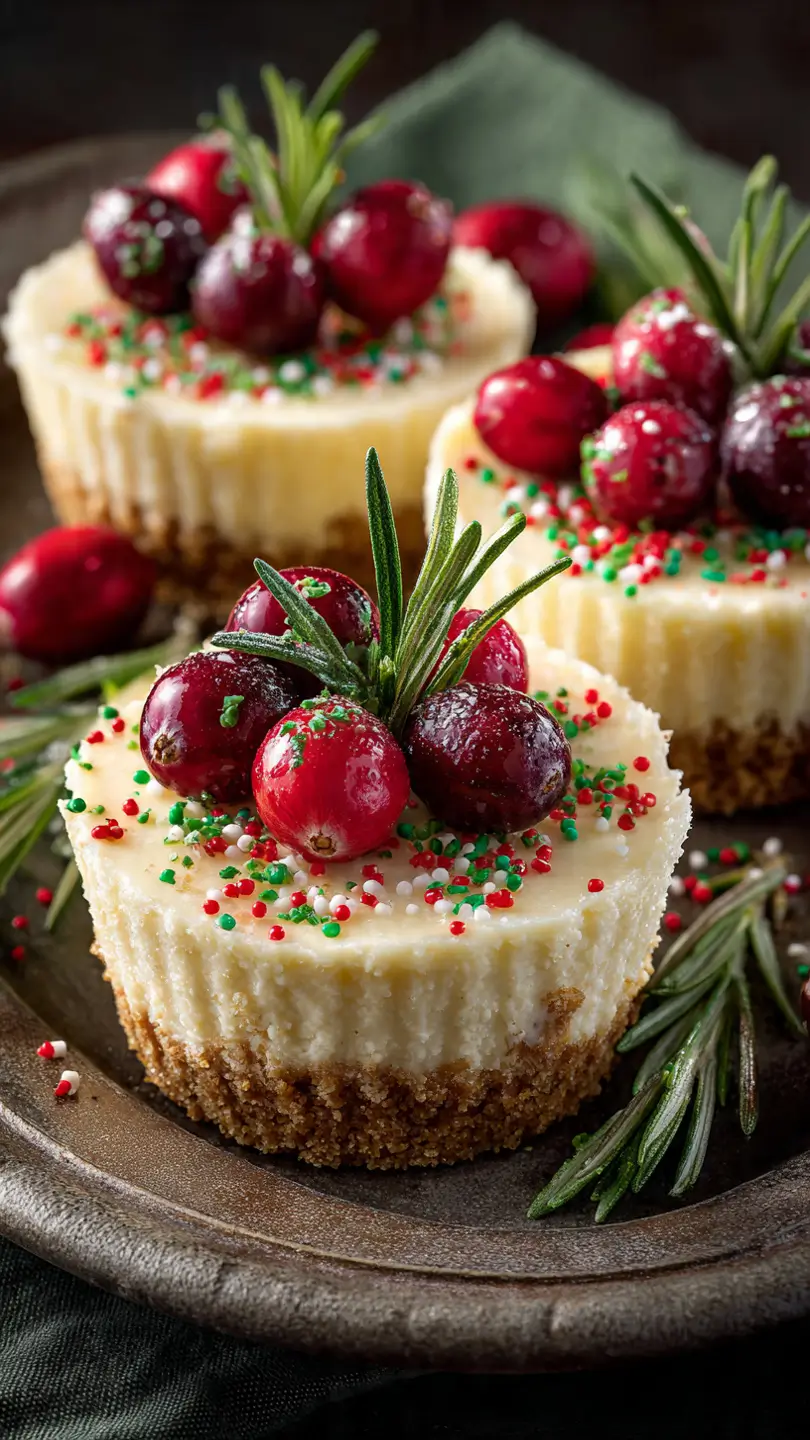
Once baked, allow the cheesecakes to cool at room temperature for about 20 minutes before refrigerating for at least an hour to fully set. Decorate with fresh cranberries, pomegranate seeds, or festive sprinkles just before serving for a gorgeous holiday presentation.
Chef’s tip: For a flavor twist, drizzle some cranberry sauce or a raspberry coulis on top before decorating!
Nutritional Information
Here’s a rough breakdown per mini cheesecake cup (makes about 12 cups):
– Calories: 180 kcal
– Protein: 4g
– Fat: 13g (mostly from cream cheese and butter)
– Carbohydrates: 11g
– Sugar: 7g
– Fiber: 0.5g
These mini desserts offer a balanced treat, especially when enjoyed in moderation during festive feasting.
Healthier Alternatives
Looking to make this dessert kinder to your waistline or diet preferences? Try these swaps:
– Use low-fat cream cheese or mix with Greek yogurt to reduce fat.
– Swap granulated sugar for natural sweeteners like honey, maple syrup, or stevia.
– Replace butter in the crust with coconut oil or a light margarine.
– Add finely chopped nuts or pumpkin seeds in the crust for extra fiber and crunch.
– Serve with a side of fresh berries for added antioxidants and vitamins.
By incorporating these tweaks, your mini cheesecake cups remain a festive indulgence with a nutritious boost.
Serving Suggestions
These adorable cheesecake cups are incredibly versatile for holiday gatherings. Here are some creative ways to serve them:
– Arrange on a festive platter with sprigs of fresh rosemary or pine for holiday elegance.
– Pair with a cup of rich espresso or mulled wine for a cozy winter evening.
– Garnish with seasonal fruits such as candied orange peel or sliced kiwi for pops of color.
– Serve alongside a dollop of whipped cream flavored with cinnamon or vanilla.
– For kid-friendly parties, let little ones decorate their own cups with colorful sprinkles or chocolate chips.
Seasonal placeholders like fresh cranberries and edible flowers help enhance the visual appeal for memorable presentations.
Common Mistakes to Avoid
Avoid these typical pitfalls to ensure every batch is a success:
– Overmixing the filling: Incorporate ingredients gently to prevent air bubbles, which cause cracks.
– Underbaking or overbaking: The center should still wobble slightly when done for creamy texture. Overbaking results in dryness.
– Skipping the chilling step: Cheesecakes need adequate refrigeration time to set properly.
– Using cold cream cheese: Always soften it first to ensure smooth and lump-free filling.
– Not pressing the crust firmly: A loose crust crumbles easily when serving.
By steering clear of these issues, you’ll impress with flawlessly creamy, beautifully shaped mini cheesecake cups.
Storing Tips
To keep your mini cheesecakes fresh:
– Store in an airtight container in the refrigerator for up to 4 days.
– Separate layers with parchment or wax paper if stacking the cups.
– For longer storage, freeze the cheesecake cups in individual containers wrapped tightly with plastic wrap for up to 1 month. Thaw overnight in the fridge before serving.
Avoid leaving them at room temperature for extended periods to maintain their creamy consistency and prevent spoilage.
Conclusion
These mini Christmas cheesecake cups offer an easy, stress-free way to delight guests with a classic dessert in a bite-sized form. With simple ingredients and foolproof steps, you can confidently bring elegance and festive cheer to your holiday table. Ready to impress your guests? Try this recipe today, and don’t forget to share your experience and favorite variations in the comments!
FAQs
1. Can I make these mini cheesecakes ahead of time?
Absolutely! Prepare, bake, and chill them a day or two before your event. Just keep them refrigerated and decorate fresh before serving.
2. Are mini cheesecake cups freezer-friendly?
Yes, they freeze wonderfully. Just make sure to wrap each cup tightly to prevent freezer burn, then thaw overnight in the fridge.
3. Can I use a different crust for these mini cheesecakes?
Definitely! Crushed cookies like Oreos or ginger snaps add a festive twist that complements holiday flavors beautifully.
4. How can I make these cheesecakes vegan or dairy-free?
Use vegan cream cheese and dairy-free butter substitutes. Also, substitute eggs with flax eggs (1 tbsp ground flaxseed mixed with 3 tbsp water per egg) for binding.
5. What’s the best way to remove mini cheesecakes from the baking tin?
Use silicone molds for easy removal or line metal tins with parchment paper cups to prevent sticking and cracking.
For more festive desserts, check out our Holiday Cookie Recipes and Easy No-Bake Desserts sections. Happy baking!